articles/Postproduction/virtualcopy-page3
Lightroom Virtual Copy - part 3 of 1 2 3 4
by Art Suwansang Published 01/08/2011

A base image for the Virtual Copy must be selected before it can be generated. Once the file is selected, go to the menu at the top of the screen, select Photo > Create Virtual Copy (fig. 3), or use the keyboard shortcut Command (Mac) or Control (PC) + ' (apostrophe). This is the basic, and fairly simple, method for creating a new virtual copy; nonetheless, here are also a few additional, advanced, tips that will come in handy.
Virtual Copy may be generated from an original Master Image, or an existing Virtual Copy. If multiple files are selected, either in sequence, or concatenated order, you can simply use the menu, or the keyboard shortcut, to generate a Virtual Copy for each of the images in the selection. Lightroom does not always create a new Virtual Copy based on the original unedited image. However, it will generate an identical version based on the state of the selected image; for instance: if the selected image is sepia treated, Lightroom will create an additional version of the sepia image. This is a great way to enhance and retain the look of a previously adjusted image giving us room to play without hesitation.
To remove a Virtual Copy simply select it and press the keyboard delete key, or right click on the image and choose delete photo. A dialogue will pop up asking for a removal confirmation (fig. 4). You can remove one virtual copy at a time or a group of them using the various selection methods. They are gone once removed; this action may be undone provided that you haven't quit or exited the program, otherwise, there's no way to recover them.

The concept of Stack organisation
Before we go further, and discuss how Virtual Copy can fit into the workflow, we have to first address another feature called Stack. Stack is an organisation subset within Lightroom that enables users to group images together and arrange the images within the group. "Stacking" is a term taken from analogue photography when we used to stack groups of transparencies, or slides, on a light table for proofing. This feature is popular with photographers, who shoot many sequential images. Stack allows images to be organised into groups, based on similarity, or automatically by capture time, where the best images in each stack can be promoted, or moved, to the top of the stack for further retouching or delivery.
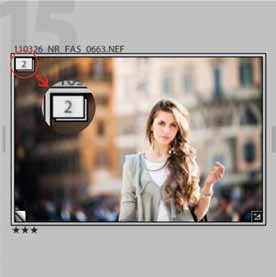
Stack is also used to organise Virtual Copy within Lightroom. All Virtual Copies are automatically grouped into a stack with the original image, upon creation. These stacks can be ungrouped, split or regrouped using the menu Photo > Stack. A stack can be collapsed to minimise clutter, and will show only the first (top) image, or expanded to view the group of images; this is done by accessing the Photo > Stack menu, or by pressing "S" on the keyboard. Stacks can be identified by their darker cell shade and white square badge on the top left corner of the first stack image (fig. 5). The number on this badge is used to indicate the number of images in the stack. Badges with a cascading white square below it indicate collapsed stacks (fig. 6).
Using Virtual Copies in your image editing workflow is a great idea. However, since the Virtual Copies are only previews and do not exist as physical files, Lightroom does handle them differently, especially when it comes to renaming and exporting. Virtual Copies cannot be renamed in Lightroom, they will always take on the same name and sequential number as the original master image.
Please Note:
There is more than one page for this Article.
You are currently on page 3
- Lightroom Virtual Copy page 1
- Lightroom Virtual Copy page 2
- Lightroom Virtual Copy page 3
- Lightroom Virtual Copy page 4
1st Published 01/08/2011
last update 21/07/2022 08:49:44
More Postproduction Articles
The Society of Photographers Convention and Trade Show at The Novotel London West, Hammersmith ...
You have 0 days until The Society of Photographers Convention Wednesday 14th January 2026


